How to install wallpaper

Recommended tools to have before you start

Before applying wallpaper, ensure the wall is smooth, clean, dry, and stable. Remove any flaking paint and loose wallpaper, and fill in any uneven areas. Sand down any rough patches, and wipe the wall with a damp cloth to remove dust. Allow the wall to dry completely before starting the wallpaper application. Click one of the buttons below to see the installation guide for any of the three different types of wallpaper:
Self-adhesive wallpaper installation
Installing the self-adhesive wallpaper is very straightforward; anyone can do it! Make sure to start by removing the self-adhesive component at the top. Remove about 5cm of this area and lightly glue the top to the wall. Then, gently peel away the film and immediately glue the remaining wallpaper. To avoid waves or air intrusion, use a regular rubber or silicone squeegee. Our wallpaper strips are 50cm wide, making them easy to handle, not requiring any additional assistance.
Step by step
Follow the steps below to ensure that your self-adhesive wallpaper securely sticks to the surface and has a flawless finish that enhances the beauty of your room. These illustrated instructions show how to install tiled wallpaper purchased by the roll. For instructions on hanging wall murals, please refer to the mural installation guide.

1: Prepare the surface
Before applying wallpaper, ensure the surface is clean, smooth, and free of dust, grease, and debris. Clean the surface thoroughly with a light detergent and water, then let it dry fully before starting.
2: Position the wallpaper
Apply the self-adhesive wallpaper to the surface, starting from one corner and working your way across. Use a wallpaper smoother or squeegee to remove any air bubbles and achieve a smooth, level finish.
3: Smooth and trim
Once the wallpaper is in place, use a squeegee or a clean, dry sponge to remove any wrinkles or bubbles. Trim any excess wallpaper using a sharp knife or scissors, making sure the edges are properly lined with the wall's corners and edges
Non-woven wallpaper installation
Gluing non-woven paper wallpapers takes a somewhat different approach than traditional paper wallpapers. Non-woven wallpapers are constructed from a combination of natural and synthetic fibres, resulting in increased durability and simplicity of installation. Follow this step-by-step guide to successfully install your non-woven paper wallpaper!

1: Prepare the surface
Before applying wallpaper, ensure the surface is clean, smooth, and free of dust, grease, and debris. Clean the surface thoroughly with a light detergent and water, then let it dry fully before starting.
2: Measure and cut
Cut the wallpaper to the necessary length, leaving a few centimetres at the top and bottom to accommodate any adjustments. Use a sharp utility knife or scissors to cut the wallpaper cleanly and precisely.
3: Mix the adhesive
Prepare the wallpaper adhesive according the manufacturer's directions. Non-woven wallpapers often require a paste-the-wall adhesive, which is applied to the wall rather than the back.

4: Apply the adhesive
With the roller apply a thin and even layer of the mixed adhesive on the wall before putting on the wallpaper. Work in small sections to prevent adhesive from drying out before applying wallpaper.
5: Hang the wallpaper
Apply the first strip of wallpaper to the adhesive-coated wall, beginning at one corner and working your way across. Smooth away air bubbles with a squeegee or wallpaper smoother for a flat and even application.
6: Match the pattern
When installing wallpaper with a design that needs to be matched at the seams, ensure that each strip is properly aligned. Use a pencil (or chalk) to mark the position of the next strip before applying the adhesive
7: Smooth and seal
Smooth any wrinkles or bubbles with a squeegee or a clean, dry sponge after installing the wallpaper. Make sure the edges and seams are properly sealed.

8: Allow to dry
Allow wallpaper glue to dry completely as per manufacturer's recommendations before handling or applying pressure to the wallpaper. This can take several hours or overnight, depending on the adhesive and climatic conditions.
9: Final touches
Once the adhesive has cured, check the wallpaper for any loose edges or corners. To secure any lifting or peeling areas, apply extra glue with a tiny brush.
Mural installation
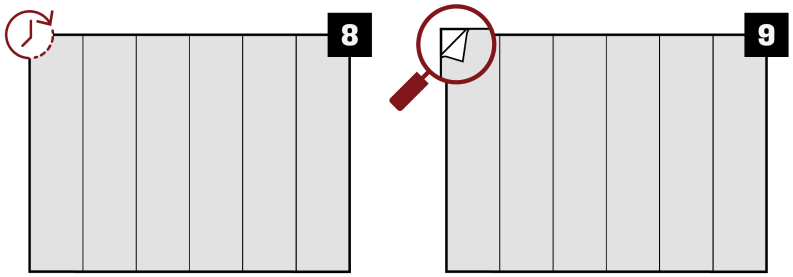
Mural wallpaper comes in many rolls, each marked with a specific number for easy assembly. Examine the number shown on the cut lines and split the rolls accordingly.
Lay them out from left to right, making sure that all of the rolls are in running order before installing them on the wall!

1: Examine the rolls
Before you begin installing the wallpaper, lay out all of the rolls and familiarise yourself with the numeral indicators on them. Check to see if everything is there, and organise accordingly.

2: Cut the rolls
Cut all of the strips per the directions. The strips are numbered in hanging order, left to right. Lay out the strips in numerical order, label facing you, beginning with 1.

3: Measure the wall
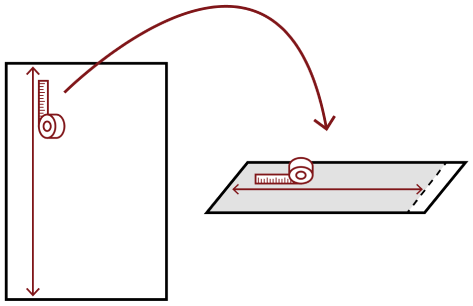
If necessary, cut each strip to the same length as your wall. Be careful, cut straight and allow enough leftover paper to trim off at the end of the installation.
4: Before gluing, double-check everything
When you've finished cutting everything, lay down all the strips. Check the entire design one more time to ensure it is in order! The strips should be hung edge to edge, without any overlap. It is crucial that the first strip be vertically straight.
5: Follow the installation guide
After everything has been double-checked, begin the gluing process according to the guides for the type of paper style you chose!
Other tips
In this section, you'll find guidance on handling tricky areas when gluing wallpaper. Learn how to navigate around corners, windows, and other irregular surfaces to ensure a smooth and professional finish. These tips will help you tackle challenging spots with confidence and precision.
Measure the distance between the edge of the previous strip and the corner and add about 3 cm. Cut the next strip based on these measurements. Place glue in the corner. Align the pattern with the previous strip, and use your smoothing tool to remove any air bubbles from the corner.
Before you install the next strip, make sure it's straight and level. If the corner is not straight, there will be a slight overlap.
legal information
For detailed information, please review our Terms and Conditions and Privacy Policy.
If you have any questions or concerns, feel free to contact us.
contact us
Customer service is available 24/7(Monday - Saturday)
Email: info@walldman.com
